Introduction to the Unity Editor
The default Unity Editor layout is organized with the most important windows you’ll need positioned to help you complete basic activities. Let’s start by reviewing them:
Unity Editor interface

There are five key areas of the basic Editor interface.
Scene view and Game view
In the center of the default Unity Editor layout is the Scene view. This is your interactive window into the world you are creating. You’ll use the Scene view to manipulate objects and view them from various angles.
In the default layout, the Game view also appears in this area; you’ll use the Game view to playtest your game.
Hierarchy window
The Hierarchy is where you can organize all the things in your project. These things are called GameObjects.
If you add a GameObject to your project in Scene view, it will be listed in the Hierarchy. If you delete a GameObject from the scene, it will no longer be listed.
Project window
The Project window is where you can find all the files (assets) available for use in your project, whether you use them or not.
The Project window works like a file explorer, organized in folders. You can drag assets directly from the Project window into the Scene view to add them to the scene.
Note the difference between the Project and Hierarchy windows: the Hierarchy contains all the GameObjects in the current scene, and the Project window contains all the assets available to your entire project.
Inspector window
The Inspector is where you’ll find and configure detailed information about GameObjects.
When you select a GameObject in Scene view or in the Hierarchy, you’ll see its components in the Inspector. Components describe the properties and behaviors of GameObjects.
Toolbar
Use the toolbar buttons to change your point of view in the scene, and start and stop Play Mode.
The scene navigation functions are hosted in a floating toolbar in your scene view. These functions allow you to move, rotate, and scale your selected GameObjects.
Review the Editor layout options
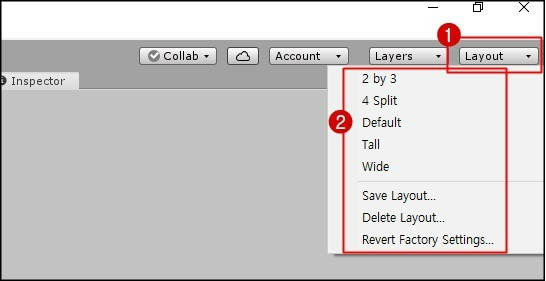
You can use the Layout menu in the Toolbar to change the arrangement of the windows in the Editor. There are several layouts provided, and you can save your own layouts.
The best layout for the Editor depends on what you are doing and your own personal preferences.
Using scenes in your project
Projects in Unity Editor are organized into scenes. Scenes are containers for everything in the experience you are creating.
One way to think about scenes is as discrete experiences. For example, each level in a game could be a separate scene, and the game’s main menu could be another.
A Unity project can have one scene or more than a hundred, depending on its scope and complexity. There aren’t strict rules about exactly how you should organize a Unity project into scenes, except that a project in Unity must have at least one scene.
To review the scenes in a Unity project:
1. In the Project window, use the navigation panel or search bar to find the Scenes folder
2. Double-click a scene to open it. You’ll see the contents of that scene in the Hierarchy and Scene view.
Navigating the scene
When working in Unity Editor, navigating in the Scene view is very important.
With practice, you can learn to navigate with ease. There are also more general settings you can use to configure the Scene view.
Let’s quickly review the basics:
- Pan: Select the Hand tool in the Toolbar, and click and drag in the Scene view to move your view.
- Zoom: Holding Alt (Windows) or Option (macOS), right-click and drag in the Scene view to zoom.
- Orbit: Holding Alt (Windows) or Option (macOS), left-click and drag to orbit around the current pivot point. Note: this option is not available in 2D mode.
- Focus (Frame Select): When a GameObject is selected, select F with your cursor in the Scene view to focus your view on that GameObject. Note: If your cursor is not in the Scene view, Frame Select will not work.
Flythrough mode
You can also use Flythrough mode to navigate in the Scene view by flying around in first person, which is common in many games. To do this: - Click and hold the right mouse button.
- Use WASD to move the view left/right/forward/backward.
- Use Q and E to move the view up and down.
- Select and hold Shift to move faster.
Scene Navigating Tools
The keyboard shortcuts for the toolbars correspond to the QWERTY keys at the top left of a standard keyboard. Using these keys, you can switch quickly between the tools and keep your mouse in the Scene view.
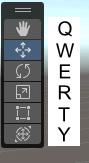
Q: Hand tool, to pan your view
W: Move tool, to select and change position
E: Rotate tool, to select and rotate
R: Scale tool, to select and change size
T: Rect Transform tool, to scale in 2D
Y: Transform tool, to move, scale, and rotate with one Gizmo
For each of the transform tools, a Gizmo appears that allows you to manipulate the GameObject along each specific axis. As you manipulate these controls, the values in the Transform Component change accordingly.
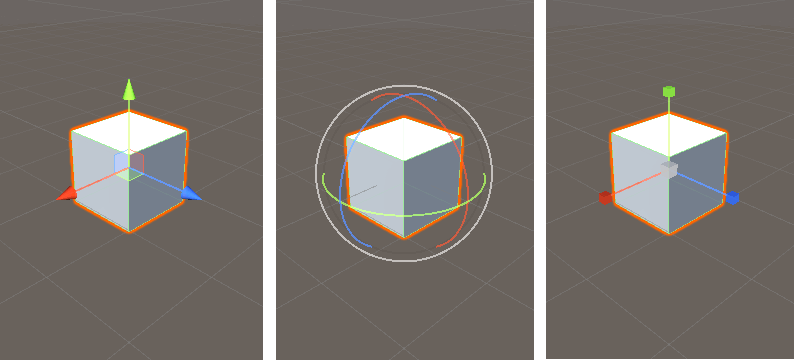
Note: If you are in a scene without any GameObjects to practice with, right-click in the Hierarchy window and select 3D Object > Cube.